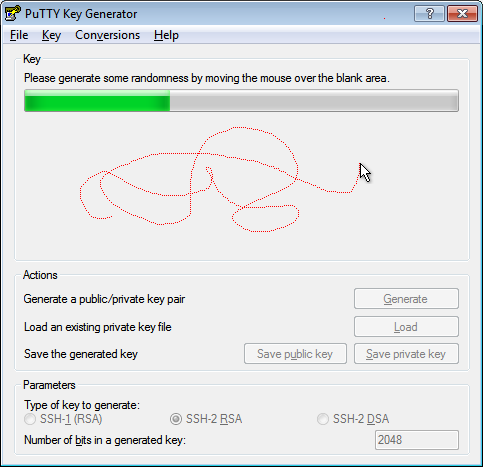
To generate an SSH key pair using the PuTTY Key Generator,
- Find
puttygen.exein the PuTTY folder on your computer, for example,C:\Program Files (x86)\PuTTY. Double-clickputtygen.exeto open it.
- Accept the default key type, SSH-2 RSA.SSH-2 is the most recent version of the SSH protocol (and is incompatible with SSH-1). RSA and DSA are algorithms for computing digital signatures.

- Set the Number of bits in a generated key to
2048bits, if it is not already set with that value.This sets the size of your key and thus the security level. A minimum of 2048 bits is recommended for SSH-2 RSA.
- Click Generate.

- Move your mouse around the blank area to generate randomness to the key.Note: the dotted red line in the image below is for illustration purposes only. It does not appear in the generator pane as you move the mouse.

- The generated key appears under Public key for pasting into OpenSSH authorized_keys file.

- The key comment is the name of the key that you will use to identify it. You can keep the generated key comment or create your own.

- If you want to password-protect your key, enter a Key passphrase and enter it again for Confirm passphrase. When you reload a saved private key, you will be asked for the passphrase, if one is set.
 While a passphrase is not required, you should specify one as a security measure to protect the private key from unauthorized use.There is no way to recover a passphrase if you forget it.
 - Save the private key of the key pair. Depending how you work with the private key in the future, you may need one saved in the PuTTY PPK format and one saved in OpenSSH format. Let's do both.
- To save the key in the PuTTY PPK format, click Save private key to save the private key of the key pair.
 You can name it anything you want, although you may want to use the same name as you used for the key comment. The private key is saved in PuTTY's Private Key (PPK) format, which is a proprietary format that works only with the PuTTY toolset.
 You can use this key whenever you use Putty to perform SSH actions.
 - To save the key in OpenSSH format, open the Conversions menu and select Export SSH key. This will be the same key as above, just saved in a different format.
 You can name it anything you want, but to keep track of your keys, you should give it the same name as the key you saved in PPK format in the previous step. You can also use any extension (or no extension), but let's use
.ssh, to make it clear what format it is. You can use this key whenever you use OpenSSH to perform SSH actions using ssh utitlities that support OpenSSH, for example when using Linux in a command shell.
- Now you need to create the public key to be paired with the private key(s) you just created. However, clicking the Save public key button will create a public key that won't work with Oracle Cloud services in certain cases. So, for the purposes of this tutorial, there is no reason to save a public key using the Save public key button.
 Instead, proceed as follows.
 - In the PuTTY Key Generator, select all of the characters under Public key for pasting into OpenSSH authorized_keys file.Make sure you select all the characters, not just the ones you can see in the narrow window. If a scroll bar is next to the characters, you aren't seeing all the characters.

- Right click somewhere in the selected text and select Copy from the menu.

- Open a text editor and paste the characters, just as you copied them. Start at the first character in the text editor, and do not insert any line breaks.

- Save the key as a text file, using the same root name as you used for the private key. Add a
.pubextension. You can give it any extension you want, but.pubis a useful convention to indicate that this is a public key.
- Write down the names of your public and private keys, and note where they are saved. You will need the public key when creating service instances in, for example, Oracle Java Cloud Service and Oracle Database Cloud - Database as a Service. You will need the private key when trying to access a service instance's virtual machine via SSH.
0 Comments:
Post a Comment